https://flourbox.com/blogs/tidbits.atomThe Flour Box - Tidbits2022-11-16T11:11:42-05:00The Flour Boxhttps://flourbox.com/blogs/tidbits/cookies-make-me-smile2022-11-16T11:11:42-05:002022-11-16T19:52:56-05:00Cookies Make Me Smile Enamel Pins from GS-JJ.comAnne Yorks
We are so thrilled with this new enamel pin from GS-JJ.com! Their team was so easy to work with and the quality of the pins are great! Plus, GLITTER!!!! I love that they were able to accommodate our request to make the smilie face sparkle!
I can't decide where to put my pin. Does it look best on my apron?
On my winter hat?
Or on my winter jacket?
With the size and sparkle, I think this pin looks good everywhere...even on my sweater!
Are you looking for pins for your shop? CookieCon? Definitely reach out the team at GS-JJ.com for beautiful enamel pins! Use this link - CLICK HERE
If you make enamel pins with GS-JJ.com, let's trade!!!
Happy Decorating!
Anne
]]>
https://flourbox.com/blogs/tidbits/mermaidcookies2022-06-16T16:25:06-04:002022-06-16T16:25:06-04:00How to Decorate FIVE Mermaid CookiesAnne YorksLet's face it, Mermaid cookies are always in season, but they are especially fun during the summer months! Check out this new post for Flour Box Club Members to provide bonus details on how to make FIVE mermaid themed cookies.
These cutters are a FLOUR BOX CLUB EXCLUSIVE CUTTER SET that are included in the Summer Club Box! You can find the FREE templates for the cookies on the newClub Dashboard(available to all active members).
Check out the step-by-step video tutorial! The main teaching point of this new tutorial is cookie PAINTING!
Check out the FREE templates for decorating these cookies in your Club email and on theClub Dashboard.
Cookie Yield
For a single batch of dough, you can make about 18-20 of the full sized cookies. I should note that I roll my cookies to 1/4" thick using the Dough EZ Rolling Mat System. The thickness of your cookies will impact your yield. Before I bake my cookies, I like to sketch them out and come up with a decorating and icing color plan!
COOKIE RECIPE: For a cookie recipe and rolling and baking video CLICK HERE - this recipe can be doubled in a KitchenAid Mixer.
For a single batch of dough, I typically use a single batch of icing. Since I'm using a KitchenAid mixer, I made a double batch of icing and split it in half (reserving half for another project).
This cookie set has 8 icing colors.
l don't measure exactly...I estimate. For a more detailed look at icing planning, CLICK HERE to read this helpful blog post.
ICING PLAN BY THE OUNCE (THIS IS BASED ON MAKING 4 OF EACH OF THESE 5 COOKIE DESIGNS - 20 COOKIES)
To keep the mermaid vibes, I created PASTEL icing colors. You won't need much color, a drop or two, to create these pretty icing colors!
White - 4 oz (pipe and flood) Black - 1 oz (pipe and flood) Buckeye Brown - 3 oz (pipe and flood) Bakers Rose - 2 oz (pipe and flood) Sienna - 3 oz (pipe and flood) Turquoise - 5 oz (pipe and flood) Royal Blue - 3 oz (pipe and flood) Purple - 4 oz (pipe and flood)
For a royal icing recipe and video CLICK HERE - this recipe can be doubled in a KitchenAid Mixer.
A few Extra Decorating Tips
Project Timeline
Plan ahead to enjoy the most success with your cookie project! I break up the decorating process. It works better with my life to do a little each day. Here is the schedule for this cookie project and estimated times on how long each phase takes.
DAY 1
Mix Dough (30 mins), Chill Dough (2 hours inactive time), Roll and Bake (1 hour), Mix Royal Icing and Prep Icing Colors - it is helpful to make the colors the day before you decorate because the color will deepen overnight (1 hour).
DAY 2
Outline and Flood Cookies (1-2 hours), Allow to dry in front of fan before adding details (1 hour for standard cookies or 5-6 hours for stenciled cookies). PAINTING details and stenciling (1.5-2 hours)
**ALLOW COOKIES TO FULLY DRY 18-24 HOURS BEFORE PACKING. STORE IN A COOL OVEN OVER NIGHT.**
DAY 3
For tips on packing cookies, CLICK HERE to check out this helpful blog post with links to my favorite packing and shipping materials.
Recreate these!
I would be so flattered if you recreated these cookies!
Be sure to tag @theflourboxshop or use hashtag #theflourbox so I can see what you create!
Common Tools in this Tutorial:
8 Food Gels: Bakers Rose, Sienna, Royal Blue, Turquoise, Purple, Buckeye Brown, Black Diamond, and Bright White
]]>
https://flourbox.com/blogs/tidbits/happyspringcookies2022-03-16T10:55:06-04:002022-03-16T10:59:08-04:00How to Decorate FIVE Happy Spring CookiesAnne YorksHappy Spring! These FIVE cookies are cheerful, colorful, and full of SPRINKLE accents!!
These cutters are a FLOUR BOX CLUB EXCLUSIVE CUTTER SET that are included in the Spring Club Box!
]]>
Happy Spring! These FIVE cookies are cheerful, colorful, and full of SPRINKLE accents!!
These cutters are a FLOUR BOX CLUB EXCLUSIVE CUTTER SET that are included in the Spring Club Box! You can find the FREE templates for the cookies on the new Club Dashboard (available to all active members).
Check out the FREE templates for decorating these cookies in your Club email and on the Club Dashboard.
Cookie Yield
For a single batch of dough, you can make about 18-20 of the full sized cookies and 9-12 of the mini bees. I should note that I roll my cookies to 1/4" thick using the Dough EZ Rolling Mat System. The thickness of your cookies will impact your yield. Before I bake my cookies, I like to sketch them out and come up with a decorating and icing color plan!
COOKIE RECIPE: For a cookie recipe and rolling and baking video CLICK HERE - this recipe can be doubled in a KitchenAid Mixer.
For a single batch of dough, I typically use a single batch of icing. Since I'm using a KitchenAid mixer, I made a double batch of icing and split it in half (reserving half for another project).
This cookie set has 9 icing colors.
l don't measure exactly...I estimate. For a more detailed look at icing planning, CLICK HERE to read this helpful blog post.
ICING PLAN BY THE OUNCE (THIS IS BASED ON MAKING 5 OF EACH OF THESE 4 COOKIE DESIGNS - 20ISH COOKIES and the MINI BEES)
White - 3 oz (pipe and flood) Black - 2 oz (pipe and flood) Buckeye Brown - 3 oz (pipe and flood) Deep Pink - 2 oz (pipe and flood) Sunset Orange - 1 oz (flood only) Lemon Yellow - 3 oz (pipe and flood) Leaf Green - 2 oz (pipe and flood) Sky Blue - 3 oz (pipe and flood) Purple - 2 oz (pipe and flood)
For a royal icing recipe and video CLICK HERE - this recipe can be doubled in a KitchenAid Mixer.
A few Extra Decorating Tips
Project Timeline
Plan ahead to enjoy the most success with your cookie project! I break up the decorating process. It works better with my life to do a little each day. Here is the schedule for this cookie project and estimated times on how long each phase takes.
DAY 1
Mix Dough (30 mins), Chill Dough (2 hours inactive time), Roll and Bake (1 hour), Mix Royal Icing and Prep Icing Colors - it is helpful to make the colors the day before you decorate because the color will deepen overnight (1 hour).
DAY 2
Outline and Flood Cookies (1-2 hours), Allow to dry in front of fan before adding details (1 hour for standard cookies or 5-6 hours for stenciled cookies). Piping details and stenciling (1.5-2 hours)
**ALLOW COOKIES TO FULLY DRY 18-24 HOURS BEFORE PACKING. STORE IN A COOL OVEN OVER NIGHT.**
DAY 3
For tips on packing cookies, CLICK HERE to check out this helpful blog post with links to my favorite packing and shipping materials.
Recreate these!
I would be so flattered if you recreated these cookies!
Be sure to tag @theflourboxshop or use hashtag #theflourbox so I can see what you create!
Common Tools in this Tutorial:
9 Food Gels: Deep Pink, Lemon Yellow, Sunset Orange, Leaf Green, Sky Blue, Purple, Buckeye Brown, Black Diamond, and Bright White
Spring Sprinkle Assortment: Pink Flowers, Yellow Confetti, Green Jimmies, Blue Nonpareils, and Purple Sugar
Coffee Filter and Tweezers
Carnation Pink Crystal Color and Round Brush
Craft Brush (optional to mix airbrush color)
Pin this post and save for later!
Happy Decorating!
Anne
]]>
https://flourbox.com/blogs/tidbits/cake-and-balloons-cookie-set2022-01-20T09:35:53-05:002022-01-31T13:33:41-05:00How to Decorate a Cake and Balloons Cookie SetAnne Yorks
I love multi cutters (one press cuts multiple cookies). And, I think cookie SETS are super fun! So I'm so excited to share this NEW Cake and Balloons 3-in-1 multi-cutter. It makes a really cute 3-piece cookie set that fits perfectly in the 7" window box from BRP Box Shop. It's sort of like a cookie puzzle!!
]]>
I love multi cutters (one press cuts multiple cookies). And, I think cookie SETS are super fun! So I'm so excited to share this NEW Cake and Balloons 3-in-1 multi-cutter. It makes a really cute 3-piece cookie set that fits perfectly in the 7" window box from BRP Box Shop. It's sort of like a cookie puzzle!!
*If you're a member of theFlour Box Club, we just sent you a special mailing with this cutter!! Surprise! I hope this kicks off your cookie year with a sweet start!
Learn how to decorate these three cookies: the Cake Base, the Cake Banner, and the Balloons. With a simplified color palette, this cookie project is easy and fun! Check out the step-by-step video tutorial!
CLICK HERE to Download the FREE Happy Birthday graphic that I used with Kodak Luma 150 cookie projector:
The multi-cutter is cool because one press makes all three cookies. Plus, since the cutter is 3-1, you don't have to worry about misplacing one of the shapes from the set. The size of the cutter is just over 6".
For a single batch of dough, I typically use a single batch of icing. Since I'm using a KitchenAid mixer, I made a double batch of icing and split it in half (reserving half for another project).
This cookie set has 4 icing colors using 4 gels.
l don't measure exactly...I estimate. For a more detailed look at icing planning, CLICK HERE to read this helpful blog post.
ICING PLAN BY THE OUNCE (THIS IS BASED ON MAKING 6 OF EACH OF THESE 3 COOKIE DESIGNS - 18 COOKIES or 6 cookie sets)
White - 9 oz (pipe and flood) Sky Blue - 3 oz (pipe and flood) Rose Pink - 5 oz (pipe and flood) Lemon Yellow - 3 oz (pipe and flood)
For a royal icing recipe and video CLICK HERE - this recipe can be doubled in a KitchenAid Mixer.
A few Extra Decorating Tips
Project Timeline
Plan ahead to enjoy the most success with your cookie project! I break up the decorating process. It works better with my life to do a little each day. Here is the schedule for this cookie project and estimated times on how long each phase takes.
DAY 1
Mix Dough (30 mins), Chill Dough (2 hours inactive time), Roll and Bake (1 hour), Mix Royal Icing and Prep Icing Colors - it is helpful to make the colors the day before you decorate because the color will deepen overnight (1 hour).
DAY 2
Outline and Flood Cookies (1-2 hours), Allow to dry in front of fan before adding details (1 hour for standard cookies). Piping details (1.5-2 hours)
**ALLOW COOKIES TO FULLY DRY 18-24 HOURS BEFORE PACKING. STORE IN A COOL OVEN OVER NIGHT.**
DAY 3
For tips on packing cookies, CLICK HERE to check out this helpful blog post with links to my favorite packing and shipping materials.
I love making birthday cookies! Get inspired by these designs. A lot of these icing colors and piping techniques could be use with the new Cake and Balloons Multi-Cutter.
A fun colorful birthday cake with candles:
Primary colors are great for all birthdays:
Dripping with pink and green icing and dripping with fun:
Tons of shimmer with gold accents and a soft touch with a watercolor technique:
Can this new set have a wedding theme? I think so!
You can never go wrong with a NEON rainbow birthday theme!
Happy Decorating!
Anne
]]>
https://flourbox.com/blogs/tidbits/bakingtoolscookies2021-11-22T11:00:07-05:002021-12-03T11:55:00-05:00How to Decorate Baking CookiesAnne Yorks
I love cookie cutters...especially BAKING themed cookie cutters. I had so much fun designing these shapes and decorating these cookies!!
]]>
I love cookie cutters...especially BAKING themed cookie cutters. I had so much fun designing these shapes and decorating these cookies!! (by the way, if you love this post, I share some bonus baking themed cookie sets below!)
*If you're a member of theFlour Box Club, you'll find these cutters and Live, Love, Bake stencil in your Winter club box!!
Check out the step-by-step video tutorial!
Layering two stencil techniques is a fun way to decorate cookies! Check out the video tutorial for tips on how to do this!
The THREE cookie cutters are exclusive Flour Box designs: Hand Mixer, Stacked Bowls, and Spatula with Icing. They can only be found here -CLICK HERE!
Cookie Yield
For a single batch of dough, you can make about 20-24 of these cookies. I should note that I roll my cookies to 1/4" thick using the Dough EZ Rolling Mat System. The thickness of your cookies will impact your yield. Before I bake my cookies, I like to sketch them out and come up with a decorating and icing color plan!
COOKIE RECIPE: For a cookie recipe and rolling and baking video CLICK HERE - this recipe can be doubled in a KitchenAid Mixer.
For a single batch of dough, I typically use a single batch of icing. Since I'm using a KitchenAid mixer, I made a double batch of icing and split it in half (reserving half for another project).
This cookie set has 6 icing colors using 4 gels. I made a dark and light version of both the Turquoise and Rose Pink.
l don't measure exactly...I estimate. For a more detailed look at icing planning, CLICK HERE to read this helpful blog post.
ICING PLAN BY THE OUNCE (THIS IS BASED ON MAKING 5 OF EACH OF THESE 4 COOKIE DESIGNS - 20ISH COOKIES)
White - 3 oz (pipe and flood) Gray - 3 oz (pipe and flood) Dark Turquoise - 3 oz (pipe and flood) Light Turquoise - 3 oz (pipe and flood) Dark Rose Pink - 3 oz (pipe and flood) Light Rose Pink - 3 oz (pipe and flood)
For a royal icing recipe and video CLICK HERE - this recipe can be doubled in a KitchenAid Mixer.
A few Extra Decorating Tips
Project Timeline
Plan ahead to enjoy the most success with your cookie project! I break up the decorating process. It works better with my life to do a little each day. Here is the schedule for this cookie project and estimated times on how long each phase takes.
DAY 1
Mix Dough (30 mins), Chill Dough (2 hours inactive time), Roll and Bake (1 hour), Mix Royal Icing and Prep Icing Colors - it is helpful to make the colors the day before you decorate because the color will deepen overnight (1 hour).
DAY 2
Outline and Flood Cookies (1-2 hours), Allow to dry in front of fan before adding details (1 hour for standard cookies or 5-6 hours for stenciled cookies). Piping details and stenciling (1.5-2 hours)
**ALLOW COOKIES TO FULLY DRY 18-24 HOURS BEFORE PACKING. STORE IN A COOL OVEN OVER NIGHT.**
DAY 3
For tips on packing cookies, CLICK HERE to check out this helpful blog post with links to my favorite packing and shipping materials.
Recreate these!
I would be so flattered if you recreated these cookies!
Be sure to tag @theflourboxshop or use hashtag #theflourbox so I can see what you create!
Common Tools in this Tutorial:
4 Food Gels: Turqoise, Rose Pink, Black Diamond, and Bright White
Coming Soon! My next tutorial is going to show how to make these cute cookie sheet cookies...
Pin this post and save for later!
More Inspiration!
A dress cutter doubles as an apron!
I used a girl cutter to make these baking friends!
This is just a fun assortment of baking themed cookies!
How about a throwback to Christmas 2012 with this sweet holiday set!
Or this baking set I created to say 'Thank you'!
I love this cookie sheet...I've made this many times over the years and will be sharing an updated tutorial soon!
I hope you enjoy your National Cookie Day!!!
Happy Decorating!
Anne
]]>
https://flourbox.com/blogs/tidbits/pumpkinandsunflowercookies2021-09-16T10:51:07-04:002021-09-16T11:51:29-04:00How to Decorate Pumpkin and Sunflower CookiesAnne Yorks
I'm grateful for cookies and for the upcoming fall season. This is my favorite time of year to be decorating! This cookie project was inspired by a beautiful field of sunflowers near my house. It's literally sunflowers as far as the eye can see!
One of the key accents on these cookies is the mini Sunflower Royal Icing Transfer Sheet. CLICK HERE to download your free sheet!
THREE of these cookie cutters are exclusive Flour Box cookie cutters, the Sunflower Plaque, the Pumpkin with Sunflower, and the Pumpkin Cluster, and can only be found here -CLICK HERE!
Cookie Yield
For a single batch of dough, you can make about 18-22 of these cookies. I should note that I roll my cookies to 1/4" thick using the Dough EZ Rolling Mat System. The thickness of your cookies will impact your yield. Before I bake my cookies, I like to sketch them out and come up with a decorating and icing color plan!
COOKIE RECIPE: For a cookie recipe and rolling and baking video CLICK HERE - this recipe can be doubled in a KitchenAid Mixer.
For a single batch of dough, I typically use a single batch of icing. Since I'm using a KitchenAid mixer, I made a double batch of icing and split it in half (reserving half for another project).
This cookie set has 5 icing colors. l don't measure exactly...I estimate. For a more detailed look at icing planning, CLICK HERE to read this helpful blog post.
ICING PLAN BY THE OUNCE (THIS IS BASED ON MAKING 5 OF EACH OF THESE 4 COOKIE DESIGNS - 20ISH COOKIES)
Buckeye Brown - 2 oz (pipe and flood) Leaf Green - 1 oz (pipe only) Golden Yellow - 3 oz (pipe and flood) Sky blue - 2 oz (pipe and flood) White - 3 oz (pipe and flood) Sunset Orange - 8 oz (pipe and flood)
Plan ahead to enjoy the most success with your cookie project! I break up the decorating process. It works better with my life to do a little each day. Here is the schedule for this cookie project and estimated times on how long each phase takes.
DAY 1
Mix Dough (30 mins), Chill Dough (2 hours inactive time), Roll and Bake (1 hour), Mix Royal Icing and Prep Icing Colors - it is helpful to make the colors AND SUNFLOWER TRANSFERS the day before you decorate because the color will deepen overnight (1 hour).
DAY 2
Outline and Flood Cookies (1-2 hours), Allow to dry in front of fan before adding details (1 hour for standard cookies or 5-6 hours for stenciled cookies). Piping details and stenciling (1.5-2 hours)
**ALLOW COOKIES TO FULLY DRY 18-24 HOURS BEFORE PACKING. STORE IN A COOL OVEN OVER NIGHT.**
DAY 3
For tips on packing cookies, CLICK HERE to check out this helpful blog post with links to my favorite packing and shipping materials.
Recreate these!
I would be so flattered if you recreated these cookies!
Be sure to tag @theflourboxshop or use hashtag #theflourbox so I can see what you create!
Common Tools in this Tutorial:
6 Food Gels: Sunset Orange, Leaf Green, Golden Yellow, Sky Blue, and Bright White
]]>
https://flourbox.com/blogs/tidbits/lemonadecookies2021-06-16T10:21:43-04:002021-06-18T09:38:28-04:00Lemonade Cookie TutorialAnne Yorks
Nothing beats the summer heat like a cool glass of lemonade...and a plate of cookies! Watch and learn how to decorate the FOUR cutters: the Lemonade Cart, the Lemonade Glass, the Lemonade Pitcher, and the Hello Summer Lemon. Also in this video, I’ll share 3 tips to set yourself up for cookie success using a template, icing guide dots, and a food market sketch on the cookie.
Nothing beats the summer heat like a cool glass of lemonade...and a plate of cookies!
Watch and learn how to decorate the FOUR cutters: the Lemonade Cart, the Lemonade Glass, the Lemonade Pitcher, and the Hello Summer Lemon. Also in this video, I’ll share 3 tips to set yourself up for cookie success using a template, icing guide dots, and a food market sketch on the cookie.
*If you're a member of theFlour Box Club, you'll find these cutters in your Summer club box!!
TWO of these cookie cutters are exclusive Flour Box cookie cutters, the lemonade cart and lemonade glass, and can only be found here -CLICK HERE!
Cookie Yield
For a single batch of dough, you can make about 18-22 of these cookies. I should note that I roll my cookies to 1/4" thick using the Dough EZ Rolling Mat System. The thickness of your cookies will impact your yield. Before I bake my cookies, I like to sketch them out and come up with a decorating and icing color plan!
COOKIE RECIPE: For a cookie recipe and rolling and baking video CLICK HERE - this recipe can be doubled in a KitchenAid Mixer.
For a single batch of dough, I typically use a single batch of icing. Since I'm using a KitchenAid mixer, I made a double batch of icing and split it in half (reserving half for another project).
This cookie set has 6 icing colors. l don't measure exactly...I estimate. For a more detailed look at icing planning, CLICK HERE to read this helpful blog post.
ICING PLAN BY THE OUNCE (THIS IS BASED ON MAKING 5 OF EACH OF THESE 4 COOKIE DESIGNS - 20ish COOKIES)
Pastel Yellow - 7 oz (pipe and flood) Dark Yellow - 2 oz (pipe and flood) Pastel Pink - 4 oz (pipe and flood) Sky blue - 3 oz (pipe and flood) White - 2 oz (pipe and flood) Black Diamond- 2 oz (pipe and flood)
Plan ahead to enjoy the most success with your cookie project! I break up the decorating process. It works better with my life to do a little each day. Here is the schedule for this cookie project and estimated times on how long each phase takes.
DAY 1
Mix Dough (30 mins), Chill Dough (2 hours inactive time), Roll and Bake (1 hour), Mix Royal Icing and Prep Icing Colors - it is helpful to make the colors the day before you decorate because the color will deepen overnight (1 hour).
DAY 2
Outline and Flood Cookies (1-2 hours), Allow to dry in front of fan before adding details (1 hour for standard cookies or 5-6 hours for stenciled cookies). Piping details and stenciling (1.5-2 hours)
**ALLOW COOKIES TO FULLY DRY 18-24 HOURS BEFORE PACKING. STORE IN A COOL OVEN OVER NIGHT.**
DAY 3
For tips on packing cookies, CLICK HERE to check out this helpful blog post with links to my favorite packing and shipping materials.
Recreate these!
I would be so flattered if you recreated these cookies!
Be sure to tag @theflourboxshop or use hashtag #theflourbox so I can see what you create!
Common Tools in this Tutorial:
5 Food Gels: Lemon Yellow, Deep Pink, Sky Blue, Bright White, and Black Diamond
]]>
https://flourbox.com/blogs/tidbits/the-crafted-cookie-a-new-cookie-decorating-book2021-03-26T10:24:54-04:002021-04-16T10:00:21-04:00The Crafted Cookie, a NEW cookie decorating book!!Anne Yorks
I have BIG news to share! I wrote a cookie decorating book titled, The Crafted Cookie! This project has been in the works for a year and I'm so excited to share that you can PREORDER the book now! It releases on May 25th!
Preordered books from the shop will be signed by me (Anne!) and will also include a set of custom Post-it flags so you can mark your book and remember favorite pages!
After working on this book for the last year, I really hope you LOVE it! The Crafted Cookie is 152 pages of pure cookie fun! The photos in the book are gorgeous! I hope the 50+ cookies in the book inspire you to find joy in cookie decorating!
The step-by-step tutorials feature 50 creative designs arranged into themed platters, cookie artists of all skill levels will have plenty of inspiration for celebrating all year long.
This book is so cool because I worked with the team at Ann Clark Cookie Cutter Co to design SIX BRAND NEW CUTTER DESIGNS!
I had the beginner in mind when I wrote the book. The first section is dedicated to all the things you need to know to decorate cookies with royal icing.
I dive into icing basics, setting up your decorating space, cookie and icing storage, navigating the cookie process, and so much more! Get my tips on making icing consistencies and coloring your icing!
The Crafted Cookieis divided into 6 parts:
Cookie Decorating 101
Celebrate with Cookies
Winter Holiday Festivities
Spring Celebrations
Hello Summer Cookies
Fall Gatherings
There are so many amazing cookie projects featured in this book! You'll have as much fun designing them as you will sharing and devouring them.
These are just some of the gorgeous platters offered:
Rainbow Birthday featuring a colorful Rainbow Cake with Candles Cookie
Classic Christmas Faces complete with a Jolly Santa, an Elf, and a Red-Nosed Reindeer
Give Thanks featuring a stunning lettered "Give Thanks" Wreath Cookie
Twinkle, Twinkle Little Star Baby Shower with a cute Sweet Dreams Pajama Cookie
Farmhouse Easter including a sweet Farm Fresh Easter Eggs Barn Cookie
Mark Your Calendar for the Biggest Virtual Launch Party EVER!
I hope you'll join me on May 25th, my book release day, for the biggest Virtual Book Launch Party ever! More details are coming, but just imagine a big COOKIE PARTY with GIVEAWAYS! DEMOS! And a BEHIND SCENES LOOK at the making of The Crafted Cookie! It will be a celebration of this new book and the joyful world of cookies!!
PREORDER your book today!
Happy Decorating!
Anne
]]>
https://flourbox.com/blogs/tidbits/springbox2021-03-16T06:50:08-04:002021-03-19T09:04:22-04:00How to Decorate a Birdhouse and Flower Pot CookieAnne Yorks
I'm starting to hear the sounds of spring and I can't wait for the flowers to start to bloom! Designing these cookie cutters and making these spring cookies was so much fun! *If you're a member of the Flour Box Club, check out your club-only video to learn how I planned these designs and icing colors!
I'm starting to hear the sounds of spring and I can't wait for the flowers to start to bloom! Designing these cookie cutters and making these spring cookies was so much fun!
*If you're a member of the Flour Box Club, check out your club-only video to learn how I planned these designs and icing colors!
These cookie cutters are exclusive cookie cutters designed by The Flour Box and can only be found here - CLICK HERE!
Cookie Yield
For a single batch of dough, you can make about 18-22 of these cookies. I should note that I roll my cookies to 1/4" thick using the Dough EZ Rolling Mat System. The thickness of your cookies will impact your yield. Before I bake my cookies, I like to sketch them out and come up with a decorating and icing color plan!
COOKIE RECIPE: For a cookie recipe and rolling and baking video CLICK HERE - this recipe can be doubled in a KitchenAid Mixer.
For a single batch of dough, I typically use a single batch of icing. Since I'm using a KitchenAid mixer, I made a double batch of icing and split it in half (reserving half for another project).
This cookie set has 7 icing colors. l don't measure exactly...I estimate. For a more detailed look at icing planning, CLICK HERE to read this helpful blog post.
ICING PLAN BY THE OUNCE (THIS IS BASED ON MAKING 10 OF EACH OF THESE 2 COOKIE DESIGNS - 20 COOKIES)
Sienna - 4 oz (pipe and flood) Turquoise - 4 oz (pipe and flood) Red Red (just a few dots to keep it pastel) - 4 oz (pipe and flood) Georgia Peach - 4 oz (pipe and flood) Buckeye Brown - 3 oz (pipe and flood) Leaf Green - 1 oz (20-sec) Black Diamond- 1 oz (pipe only)
Plan ahead to enjoy the most success with your cookie project! I break up the decorating process. It works better with my life to do a little each day. Here is the schedule for this cookie project and estimated times on how long each phase takes.
DAY 1
Mix Dough (30 mins), Chill Dough (2 hours inactive time), Roll and Bake (1 hour), Mix Royal Icing and Prep Icing Colors - it is helpful to make the colors the day before you decorate because the color will deepen overnight (1 hour).
DAY 2
Outline and Flood Cookies (1-2 hours), Allow to dry in front of fan before adding details (1 hour for standard cookies). Piping details and stenciling (1.5-2 hours)
**ALLOW COOKIES TO FULLY DRY 18-24 HOURS BEFORE PACKING. STORE IN A COOL OVEN OVER NIGHT.**
DAY 3
For tips on packing cookies, CLICK HERE to check out this helpful blog post with links to my favorite packing and shipping materials.
]]>
https://flourbox.com/blogs/tidbits/a-month-of-cookie-joy-and-savings2020-11-02T08:59:56-05:002020-11-09T08:13:19-05:00A Month of Cookie Joy and Savings!Anne Yorks
The statistics are saying holiday shoppers are shopping online and shopping early this year. That’s why we’re making Black Friday last the whole month of November!
And a COOKIE JOY GIVEAWAY! For every order over $25, you will receive that week’s Mystery Apron Pin. We created these pins to help you express your cookie joy! Collect them all!
Take a look at our weekly promotions and plan your savings!
Week 1 - 11/2 - 11/8Save $5 on the Dough EZ Rolling System
This week only, Save $5 on the Dough EZ rolling system! Roll beautiful, even cookies every time with the Dough EZ rolling mat - with little to no added flour! Plus, a FREE MYSTERY APRON PIN will be on U.S. orders over $25 ALL WEEK LONG! No coupon code needed, discount automatically added at checkout. Cannot be combined with another order. Limited quantities, no rainchecks.
All week long save 10% on tipless bags, scribes, color charts, tips and more!! Discounts automatically applied at checkout!
Week 3 - 11/16 - 11/22Save $5 on a $30 Sugarbelle Purchase
Save $5 when you purchase $30 of Sugarbelle products, includes cutter sets and tools! Coupon automatically applied at checkout.
Week 4 - 11/27 - 11/29(Black Friday/Cyber Monday) $99 Cookie Countess Airbrush and Free Shipping on U.S. Orders $25+
Starts on Black Friday...the most popular airbrush system will be $99, plus free shipping on U.S. orders over $25!
ALL MONTH LONG - MYSTERY APRON PINS!
We want to help you express your COOKIE JOY all month long with new Mystery Apron Pins! We are popping a free pin in every box over $25! A new design will be released weekly!
A note about all sales:
We have limited inventory on some of these items. We are unable to raincheck any of these deals, so if you've had your eye on a particular sale product, we highly recommend marking your calendar and ordering early!
Get inspired!!
Throughout the month of November we also hope to share new holiday tutorials and will be releasing a new holiday online class! There is just so much cookie fun to look forward to!
If you have any questions, get in touch with The Flour Box team by emailing hello@flourbox.com!
Happy Decorating!
Anne
]]>
https://flourbox.com/blogs/tidbits/new-online-class-girls-night-out-cookies2020-05-12T07:32:00-04:002020-05-12T07:35:45-04:00New Online Class - Girls Night Out CookiesAnne YorksOn Tuesday, May 26th at 6:30 pm, Anne will be teaching a live, online class with Chibo (a division of GE Appliances)! Learn how to make 4 Girls Night Out cookies cookies: Shoe, Diamond, Purse, and Lipstick.
Chibo is cool because it is INTERACTIVE! The decorating is in REAL TIME! And you can watch and learn from ANYWHERE!
On Tuesday, May 26th at 6:30 pm, Anne will be teaching a live, online class with Chibo (a division of GE Appliances)! Learn how to make 4 Girls Night Out cookies cookies: Shoe, Diamond, Purse, and Lipstick.
Chibo is cool because it is INTERACTIVE! The decorating is in REAL TIME! And you can watch and learn from ANYWHERE!
Here's how it works:
1. Register for the online class with Chibo for $30 -click here! 2. [optional] Pick up the Cutters OR the Cinco de Mayo Cookie Decorating Kit to help get ready for class (Click Here for Cutters and Stencil only)(Click Here for Girls Night Out Kit) 2. Prep cookies and icing before class starts using the prep guide from Anne. 3. Jump online at 6:30 pm (EST) on May 26th and decorate Girls Night Out Cookies together!! The class is interactive, so ask questions and talk with Anne while you work!
Only need the cutters? Here's the cutter/stencil-only bundle for the class cookies -Click here! The cutter bundle is $13.46.
OPTION #2 - Girls Night Out Decorating KIT
Need the essential cutters, stencil gel colors, tip #44, boo boo stick, scraper, notta cookie, and icing bags? CLICK HERE (please note, this kit does not include tip #2 or couplers, both needed for class. These would need to be purchased separately)
TThis Girls Night Out Cookie Decorating Kit was created for the May 26th online class hosted by Chibo and The Flour Box! Register for the class and decorate along with Anne from your own home Register for the LIVE online class - CLICK HERE. This LIVE class is interactive, so come with questions! The cost for the class registration is $30. This LIVE class is interactive, so come with questions! Get ready for the class with this bundle!
The Girls Night Out Kit includes these cutters: Platform Shoe, Lipstick, Purse, and Diamond. This kit includes the 'Leave a Little Sparkle' Stencil, Icing Scraper, and Notta Cookie. Also included is 2 Wilton tip #1, 1 Wilton #44 tips, 10 tipless bags, 2-1 tool, and 3 Chefmaster Food Gels: White, Deep Pink, and Black Diamond. When you register for the class, you will be emailed a class prep guide.
CLASS PREP GUIDE
Once you register for the class, you will be emailed a Prep Guide for class. This guide includes the icing and cookie recipes, icing color suggestions, and a pinata piping guide! It's pretty nifty.
[insert prep guide photo]
CLASS CONTENT
In this class, we will take our wet-on-wet technique to the next level with this leopard shoe!
We'll also discuss my best tips for royal icing stenciling!
This class would be ideal for a decorator with limited experience looking to expand their knowledge of royal icing consistencies and techniques.
]]>
https://flourbox.com/blogs/tidbits/new-online-class-cinco-de-mayo-cookies2020-04-16T10:30:00-04:002020-04-16T10:39:40-04:00New Online Class - Cinco de Mayo cookiesAnne YorksOn Saturday, May 2nd at 1pm, Anne will be teaching a live, online class with Chibo (a division of GE Appliances)! Learn how to make 4 Cinco de Mayo cookies: Pinata, Sombrero, Margarita Glass with Lime, and Cactus.
Chibo is cool because it is INTERACTIVE! The decorating is in REAL TIME! And you can watch and learn from ANYWHERE!
On Saturday, May 2nd at 1pm, Anne will be teaching a live, online class with Chibo (a division of GE Appliances)! Learn how to make 4 Cinco de Mayo cookies: Pinata, Sombrero, Margarita Glass with Lime, and Cactus.
Chibo is cool because it is INTERACTIVE! The decorating is in REAL TIME! And you can watch and learn from ANYWHERE!
Here's how it works:
1. Register for the online class with Chibo for $30 -click here! 2. [optional] Pick up the Cutters OR the Cinco de Mayo Cookie Decorating Kit to help get ready for class (Click Here for Cutters only)(Click Here for Cinco de Mayo Kit) 2. Prep cookies and icing before class starts using the prep guide from Anne. 3. Jump online at 1pm (EST) on May 2nd and decorate Cinco de Mayo Cookies together!! The class is interactive, so ask questions and talk with Anne while you work!
Only need the cutters? Here's the cutter-only bundle for the class cookies -Click here! The cutter bundle is $7.96.
OPTION #2 - CINCO DE MAYO KIT
Need the essential cutters, gel colors, tip #44, boo boo stick, and icing bags? CLICK HERE (please note, this kit does not include tip #2 or couplers, both needed for class. These would need to be purchased separately)
The Cinco de Mayo kit is $31.99
This Cinco de Mayo Cookie Decorating Kit was created for the May 2nd online class hosted by Chibo and The Flour Box! Register for the class and decorate along with Anne from your own home (click here to sign up for the class)! The cost for the class registration is $30). This LIVE class is interactive, so come with questions! Get ready for the class with this bundle!
The Cinco de Mayo Kit includes these cutters: Pinata, Sombrero, Cactus, and Margarita with Lime. Also included is 4 Wilton #44 tips, 10 tipless bags, 2-1 tool, and 7 Chefmaster Food Gels: White, Deep Pink, Lemon Yellow, Sunset Orange, Black Diamond, Leaf Green, and Sky Blue. When you register for the class, you will be emailed a class prep guide.
CLASS PREP GUIDE
Once you register for the class, you will be emailed a Prep Guide for class. This guide includes the icing and cookie recipes, icing color suggestions, and a pinata piping guide! It's pretty nifty.
CLASS CONTENT
In the class, students will learn how to decorate a Pinata, Sombrero, Margarita, and Cactus. This class would be ideal for a decorator with limited experience looking to expand their knowledge of royal icing consistencies and techniques.
]]>
https://flourbox.com/blogs/tidbits/bakers-whats-next2020-03-18T07:35:00-04:002020-03-18T08:04:23-04:00Bakers, What's Next? 7 Practical Tips to Add some Certainty to Your LifeAnne Yorks
I have gotten an email from every company I have purchased from since 2004 and they all say the same thing...'Here's how we are navigating these uncertain times.' Just that phase makes me feel uneasy and not reassured. I'm sure I'm not alone.
So, when I read that stuff, I choose to focus on the certainty in my life. I'm taking all advice from officials seriously. That is certain. I'm prepping my heart and mind to have my kids do school at home. That is certain. And, I'm darn certain that I'm tough as nails and will do everything in my power to meet this challenge head on with as much grace and kindness as possible. Don't be afraid, I tell myself (Philippians 4:6) WE CAN DO THIS! I am certain.
Can we pinky promise on something? Let's make a pact to stick together. We can encourage each other in the low times. We can offer the world our cheerful baked creations even if they are in photo form!
Can I provide a little certainty? Reassurance? Here are 7 practical tips...
1. Take care of your customers.
If they must cancel an order, can you offer a credit toward a future project? Or even a refund? It might go against your policy and contract, and it's hard on business now, but we will be baking again soon. Our customers will love us for being caring. Do you need to freeze cookies for a postponed event? You can save the cookies...here's how I freeze cookies [CLICK HERE].
2. Keep sharing your beautiful creations on social media!
Fill up the world with colorful cookies. It's simple, but they make people smile. I love scrolling on Instagram and looking at your cookies. Please keep posting. I forget what you did a year ago or 3 years ago, so don't be afraid to share something from the archives.
3. Is this your cue to take a much needed break from baking?
Are you burned out from the holiday rush, Valentine's Day, and prepping for Easter. Those holidays can take the wind out of your sails and burn up your creativity. Maybe for the next few weeks leave #teamnosleep and join up with #teamlovestosleep.
4. Or is baking your therapy?
It is mine. When things become uncertain, decorating cookies is what helps me feel normal. Can you take a little time to bake for fun. It's time to just explore a new cutter or technique. Or make something for a loved one. I just read this article yesterday about bringing meals to others during these times. CLICK HERE to check out these practice tips if you're sharing baked goods.
5. Get organized.
I am going through fits of productivity and exhaustion in this situation. When I get a burst of energy, I do something. And when I'm low on energy, I snuggle with my kids and watch a movie. It's all ok. But, if you love to keep busy, here's what I suggest:
Finally sort through your cutters. Confession: I still haven't unpacked my cutter boxes since we moved last June! I'm going to take it one box at a time and get them organized. I like to keep them in labeled ziplock bags (by theme). Then I alphabetize the bags into large baskets. I know have duplicates and can share them with friends and neighbors that would love to have a reason to get in the kitchen. So I'm going to post my dups on my church and personal page and can mail them to people :)
Clean out your tools. Sort and get your drawers looking pretty. Clean out your colors, wipe them down and clean your storage containers.
Organize your stencils. Do you have a big box or binder? CLICK HERE - to see how I store my stencils! Right now I have a pile of stencils that need to be filed back into place. It's a good project for the evenings when I'm too tired to decorate, but have a little energy to do something mindless.
6. Plan ahead.
Don't laugh, but it's not too early to think about fall and holiday designs. That season is a money-maker for bakers, make it your best yet! You don't need to bake samples, but you can start sketching, working on your pre-sale release dates, and maybe come up with some new ways to promote and market your cookies. Plus, you can work on a production schedule. Maybe you know you can make 30 dozen cookies in a week. Great! Start planning for your biggest season yet, by maximizing your freezer space (again, check out my freezer tips. They are great for holidays and big orders)
How are you using this time to advance your decorating skills, plan for your business, or take of yourself? Please share in the comments for all to read!
Guys, we will get through this. Let's stick together and encourage one another.
Sending much love and prayers to all my baker friends!
Anne
]]>
https://flourbox.com/blogs/tidbits/new-online-class-with-chibo-bee-cookies2020-02-18T06:54:00-05:002020-02-18T07:00:50-05:00New Online Class with Chibo - BEE COOKIESAnne YorksOn March 16th, Anne will be teaching a live, online class with Chibo (a division of GE Appliances)! Learn how to make 4 cookies from this set: the Cute Bee, Beehive, Dottie Daisy, and Honey Jar!
Chibo is cool because it is INTERACTIVE! The decorating is in REAL TIME! And you can watch and learn from ANYWHERE!
On March 16th, Anne will be teaching a live, online class with Chibo (a division of GE Appliances)! Learn how to make 4 cookies from this set: the Cute Bee, Beehive, Dottie Daisy, and Honey Jar!
Chibo is cool because it is INTERACTIVE! The decorating is in REAL TIME! And you can watch and learn from ANYWHERE!
Here's how it works:
1. Register for the online class with Chibo for $30 - click here! 2. [optional] Pick up the Bee Cookie Decorating Kit to help get ready for class (FIND IN SHOP) 2. Prep cookies and icing before class starts using the prep guide from Anne. 3. Jump online at 630 (EST) on March 16th and decorate Cute Bee Cookies together!! The class is interactive, so ask questions and talk with Anne while you work!
This Cute Bee Cookie Decorating Kit was created for the March 16th online class hosted by Chibo and The Flour Box! Register for the class and decorate along with Anne from your own home (click here to sign up for the class! The cost for the class registration is $30). This LIVE class is interactive, so come with questions! Get ready for the class with this bundle!
The Bee Kit includes these cutters: Chunky Daisy (used for both the bee and the dottie flower), Beehive, and Small Mason Jar. Also included is a yellow foodoodler marker, 5 Wilton #2 tips, 1 Wilton #1 tip, 10 tipless bags, 5 couplers, thingamagenie tool, and 5 Chefmaster Food Gels: White, Deep Pink, Lemon Yellow, Black Diamond, and Sky Blue. When you register for the class, you will be emailed a class prep guide including a printable template for the bee cookie.
Once you register for the class, you will be emailed a Prep Guide for class. This guide includes the icing and cookie recipes, icing color suggestions, and the bee template! It's pretty nifty. Since the class is on a Monday evening, I suggest you prep for class over the weekend :)
CLASS CONTENT
In the Bee Class, students will learn how to decorate a Cute Bee, Beehive, Honey Jar, and Dottie Daisy cookie. This class would be ideal for a decorator with limited experience looking to expand their knowledge of royal icing consistencies and techniques.
]]>
https://flourbox.com/blogs/tidbits/willy-wonka-cookies2020-02-15T07:57:00-05:002020-02-15T07:57:45-05:00Willy Wonka CookiesAnne Yorks
So are you a Gene Wilder or a Johnny Depp Willy Wonka fan? Me? I'm a little of both. I loved both movies and so making these cookies for my daughter's school play was a total blast!
]]>
So are you a Gene Wilder or a Johnny Depp Willy Wonka fan? Me? I'm a little of both. I loved both movies and so making these cookies for my daughter's school play was a total blast!
This has been a tricky week (valentine's cookies + CookieCon booth prep), so sadly, no videos of these fun cookies. But here are a few tips on how I created them!
Does the Willy Wonka cutter look familiar?
It's the nutcracker from the Sugarbelle Here Comes Santa set (on clearance from the holidays for $7.99 right now!)
As a side note, these Christmas cookies are fun to make! I made these for my daughter's youth group Christmas party...
The real fun of the project was in making the candy!
I think even Willy Wonka himself would be impressed with these lollipops. I embellished them with the glitter sprinkles.
Did you eat button candy as a kid? I could never decide of different colors had different flavors or if they all tasted the same. Regardless, I love these papers!
And a Willy Wonka set would not be complete without some golden tickets!
Can you guess what cutter made the Oompa Loompa?
The bell cutter!
Will my sketches help you recreate your own Willy Wonka Cookies? Here you go! Please pardon the lined paper...this was a late night job!
If you recreate these cookies, I would be sooo flattered! Be sure to share a photo or tag me so I can see what you make!
Happy Decorating!!
Anne
]]>
https://flourbox.com/blogs/tidbits/cookiecon-or-bust2020-02-11T11:44:00-05:002020-02-11T16:37:11-05:00CookieCon or BUST!Anne Yorks
The Flour Box team leaves for CookieCon in two weeks and we couldn't be more excited! We are literally going to take the Flour Box show on the road. Think fun cookie products, exciting cookie decorating demos, and meet members of our amazing team!!
Here's our staging area right now!! (organized chaos at it's best!)
Haven't heard of CookieCon? You need to visit www.cookiecon.com for the details. It's a trade show that brings together the cookie decorating community. There are tons of classes, demos, a sugar show, cookie tasting, and lots of crazy cookie people! This year, the event is in Louisville, Kentucky on February 26-29. It is sold out, but you can add this to your radar and try to get a ticket for 2021 (location TBA)! I'm a big fan of CookieCon and attend each year! It's an amazing opportunity for our community to come together, have fun, learn, share cookies and buttons, and just have lots and lots of fun.
Will you be at CookieCon? Come visit The Flour Box in the Vendor Room! We have reserved booth 15 and 16.
This is the first year The Flour Box will be a vendor and we could not be more excited (and a little nervous if I'm honest). Here's what we have planned and we hope you'll stop and say hi!
Meet our Team
We love being an online shop, but we want to meet you face-to-face! Come say hi and let's talk about cookies!!! My husband Topher and our daughter Cecelia will be making the trip to Kentucky to help with our booth. We are also bringing Kristyn and Stacy from the Flour Box team! We are all so excited to connect with everyone at CookieCon.
Get a FREE Button or Sticker
We have ordered some really fun buttons and stickers to share and trade!! Do you want to be branded as a SMART COOKIE? Then come get a button! Hooray!
Learn and Shop
Get inspired by the dozens of finished cookie samples on display in our booth. We are also going to be selling stuff. Yep! If you're looking for cutters, stencils, genie products, and cookie tools come see us! We are bringing our 7 best-selling Cookie Decorating Kits and we will be releasing one NEW KIT at CookieCon! Our team will be available all weekend to help you with your cookie questions!
Live Cookie Decorating!!
I will be bringing cookies and icing and decorating in our booth. I am excited to share some of my favorite techniques, answer your questions, and show you have to use some of my favorite cookie tools! I'll post a schedule soon so you can plan ahead if you want to stop by!
Are you a CookieCon Newbie??
Is this your first time coming to CookieCon? I'm sure you're excited, but maybe you're a little nervous too? That's normal. This is the most friendly, helpful amazing crowd on the planet. You will be in good company!
The event has grown over the years (yay!) and there is more to do than you'll have time for. I suggest making a list of the things you can't miss (demos, classes, etc) so that you prioritize what is most important to you. Build in some buffer time to hang in the common areas and meet new people!! Don't miss some of my favorite parts of CookieCon:
The cookie tasting on Saturday morning. Grab a coffee and get your tray of samples. This is so fun and tasty. I love to gobble them up!
Visit the Sugar Show. Be confident and bring a contribution to the show. All levels are on display. The room is FULL of creativity don't miss visiting it!
Make the most of your classes. Bring a notebook and an open mind. Keep track of ideas you want to bring back home. I love taking time on the return trip to pick a few things to try as soon as I get home.
Visit The Flour Box team in the vendor room (hahahaahaha....shameless self promoting here). We are friendly and would love to see you. So if you find yourself with a little window of time, come say hello!!!
Got CookieCon questions? Post them below! I'd love to share my excitement for the event!
Hope to see you in two weeks!
Anne
]]>
https://flourbox.com/blogs/tidbits/how-to-make-valentine-paint-your-own-cookies2020-01-21T13:49:00-05:002020-01-22T08:45:48-05:00How to Make Valentine Paint-Your-Own CookiesAnne YorksThe most perfect Valentine cookie activity for kids has to be painting cookies. These are commonly called PYO cookies - stands for Paint-Your-Own.
Not only are these cookies super easy to make and fun for kids to paint, there is virtually no clean up at the end of the party. They are great for a sleepover activity, birthday parties, and classroom parties.
Check out this in-depth cookie tutorial to learn what supplies you'll need, how to make these cookies, and tips for painting.
]]>
The most perfect Valentine cookie activity for kids has to be painting cookies. These are commonly called PYO cookies - stands for Paint-Your-Own.
Not only are these cookies super easy to make and fun for kids to paint, there is virtually no clean up at the end of the party. They are great for a sleepover activity, birthday parties, and classroom parties.
Check out this in-depth cookie tutorial to learn what supplies you'll need, how to make these cookies, and tips for painting. Plus, below, see the guide for matching up the right sized cutter to the stencil! And get some easy packaging and painting party tips!
PREPPING THE COOKIES
It's time to take the guesswork out of matching up the stencil to the cutter. We are working on a guide for each holiday, but here is an easy cheat sheet to help you Valentine's Day. Generally, I have found that these 6 cutters work with MOST (not all) PYO stencils. You probably have these already in your cutter bin: 3.5" Circle, Photo Plaque, 3.5" Square, Square Plaque, LilaLoa Plaque, and Rectangle.
On each Valentine PYO stencil product page, we have added a photo of how the stencil looks like with a cutter. We have also linked to the cutters in the product description.
STENCILING TIPS
I like to use stiff icing when stenciling and apply it witha scraper.You probably saw in the video that I generously spread on the icing, but remove the excess. This not only keeps that image clear and crisp, but it makes it possible to reuse the stencil multiple times (you can probably do 6-12 - or more - cookies before you need to clean it).
SUPER IMPORTANT PYO COOKIE TIP:I don't recommend airbrushing these images for a PYO cookie. During painting, the color really smudges and makes a mess of the cookie.
I have hosted and taught dozens and dozens of cookie classes, and Cookie Painting Parties by far was the easiest. They are easy to prep and set-up and soooooo easy to clean up. Plus the kids LOOOOVED IT!
Check out these for tips on hosting your own Cookie Painting Party!
Once the cookies are stenciled and ready (use above tutorial to learn how to make them), it's time to prep for the party. Let's break down each step of the process:
1. First, set the table.I created a work station for each painter. I used a wipeable decorating mat, but you could easily use a paper plate! I put out the cookies that were ready to be painted. And I had a few examples for them to get inspiration. Set-up your work stations. I gave each painter a small dish of water, paper towel, and a couple edible paint palettes.
3. Do a DEMO cookieso the painters can see how to use the palettes. I gave the painters tips on make their projects successful. The two best tips are: don't add too much water to your brush (or cookie surface) AND stay inside the black lines of the designs. These tips will REDUCE SMUDGING and keep the cookies looking pretty.
5. Active painting time. We did 4 cookies per person and the painting fun lasted about 45 minutes. This activity is really fun for children of all ages! My 6-year-old loved it and was very successful, but the older girls were also totally into it!
6. Packing up the cookies and taking them home...the results were impressive! These girls were 10 years old and I think they did an amazing job. I carefully put the cookies on a paper plate (don't stack them!) and covered them with tin foil. You could have boxes ready, but the paper plate was just easier and cheaper.
MATERIALS LIST:
So here's what you'll need to make PYO cookies (these are just suggestions):
]]>
https://flourbox.com/blogs/tidbits/how-to-freeze-cookies-and-dough2020-01-13T15:51:00-05:002022-02-06T13:54:51-05:00How to Freeze Cookies and Dough AND ICINGAnne Yorks
When it comes to cookie decorating, one of the most under appreciated tools in your kitchen might be your freezer! Your freezer will be helpful throughout the decorating process, especially with a very large cookie order, a busy cookie holiday season, or even just balancing a cookie project with a busy life schedule.
Before we get started, I want to mention that sometimes people can be uncertain about freezing. It's not cheating. It's not a short-cut. It's a tool in your kitchen that can help you be more efficient. So be confident if you choose to freeze after reading this post.
]]>
POST UPDATED Feb. 6, 2022 with tips on storing royal icing! Scroll down!
When it comes to cookie decorating, one of the most under appreciated tools in your kitchen might be your freezer! Your freezer will be helpful throughout the decorating process, especially with a very large cookie order, a busy cookie holiday season, or even just balancing a cookie project with a busy life schedule.
Before we get started, I want to mention that sometimes people can be uncertain about freezing. It's not cheating. It's not a short-cut. It's a tool in your kitchen that can help you be more efficient. So be confident if you choose to freeze after reading this post.
Here are my best freezing tips for dough and cookies.
Tips for Freezing Dough
Whether you're mixing dough in large quantities or using a smaller stand mixer to work ahead, here are some tips for freezing cookie dough.
I successfully mixed double batches of dough in my 5-quart mixer for years before leaping to a 20-quart mixer. In 2012, I invested in a large 20-quart Advantco Mixer.
Her name is Big Bertha (named after my Nana). I love this mixer because it can handle mixing 8 batches of dough at once - I call it a JUMBO BATCH. If I have a busy baking season on the horizon, I will mix 3 Jumbo Batches in one morning.
Tip #1: Mix Enough Dough to Cover a Certain Time Frame
Making dough in that quantity is definitely a time saver. I like to mix enough dough that I only have to do it once per month. That means I only have to shop once per month, prep ingredients once per month, mix dough once per month, and clean up the mixer once per month.
Tip #2: Freeze Dough in a Patty, not a ball shape
After I mix my dough, I scrape the bowl well and remove all the dough. I set it on plastic wrap (I have the large roll from Sam's Club). I fold the plastic over the dough and then I press it flat. Storing as a patty will maximize your freezer space AND make rolling out your dough much easier.
Tip #3: Wrap Your Dough Well
Keep your dough as fresh as possible by wrapping well. I wrap in plastic wrap and then insert each patty into a Gallon Ziplock Freezer-Quality Bag. There is a difference in the plastic between the standard gallon and freezer gallon. Go for the upgrade! Add the date to the dough for an easy reference.
Tip #4: Thaw the Night Before
The day before you plan to roll and bake. Take the dough out of the freezer and put it in your fridge to thaw overnight. I love rolling dough that has been frozen, but that is not STILL frozen. Hahaha. It could be a food risk to try to quickly thaw on your counter. Stay safe by planning 1 day ahead.
Tip #5: Watch out for the Funky Freezer
Avoid strange odors seeping into your beautiful vanilla dough! I am fortunate that my freezer is only for cookies and dough. But if you have to share freezer space with your family freezer, be sure to clean it out regularly and keep an up-to-date box of Arm & Hammer baking soda in it.
Tips for Freezing Undecorated Cookies
Go ahead, do a big bake and freeze your cookies. Get ahead and bake several projects at once and pull them out of the freezer when you're ready to decorate!
Tip #1 Bake and Cool
For maximum freshness, bake your cookies and allow them to cool before freezing. I like to freeze as soon as the cookie feels cool (usually cools completely in under an hour).
Tip #2 Stack and Store
I have used different freezer containers to freeze cookies, but in the end, I usually use the gallon ziplock bag. I find that 24 cookies (4 stacks of 6 cookies) fit perfectly in the bag. And this fits well in my freezer. I am using a side-by-side fridge/freezer unit. I'll stack 3 bags high on one shelf and I can usually fit two rows, so that is 144 cookies stored per shelf. I don't have an issue with cookies breaking, but I'm careful with how I pack and stack the cookies (keeping the large, less fragile shapes on the bottom).
Tip #3 Allow 3-4 Hours for Cookies to Come to Room Temp
I don't decorate the cookies frozen. To be honest, I haven't tried it. It just seems safer to decorate room temp cookies. I pull the cookies out 3-4 hours before I decorate and set the package on the counter. I keep the ziplock bag closed, no need to open, the cookies will just start to get stale. If I'm planning an early start to the day, I will pull the cookies out the night before.
Freezing cookies is especially helpful for my cookie classes. I love to bake in advance and freeze so I can focus on other areas of class prep leading up the class. I can spend up to 4 hours baking for a full class weekend. It's nice to get this done in advance. (by the way, did you know I have an ebook dedicated to hosting classes? I do! Check it out - CLICK HERE)
Tips for Freezing Decorated Cookies
Whether or not I'm planning to freeze, I like to complete the cookie process in 36 hours (that's from baking to decorating to wrapping). I find this is best for my cookie freshness. I will bake the night before I decorate. Then I decorate the next day. I let the decorated cookies dry in the cool oven overnight, and then I'll wrap the next morning.
Decorated Cookies freeze really well. More often than not, I work ahead and freeze almost all of my cookies (especially for my own family projects). I love having a buffer zone with cookie deadlines (and in life), so if I can work ahead, I will make the effort to do so.
Tip #1 Allow icing to Dry before Freezing
After you decorate your cookies, allow the icing to dry 18 hours. I store my decorated cookies in a cool oven overnight before I pack and freeze.
Tip #2 Store in Freezer Bag or Container
Use a freezer quality container or bag (same reasons as above). If you are freezing the cookies unwrapped, be sure to layer parchment or wax paper between the cookies to avoid leaving butter marks on the cookies. I typically pack all of my cookies before freezing in a heat sealed plastic bag (get more tips on packing cookies - click here). I'll even add ribbons or the bubble pouch before freeze, just so the cookies are ready to pull and go!
Tip #3 Allow 3-4 Hours for Cookies to Thaw
Last year, I did an order for 1,200 cookies. If I'm working on a big project, I know I can comfortably bake and decorate 200 every 2 days. I freeze as I go. Then when the cookies are due, I pull them out of the freezer.
**Important Freezer Tip! It's important to allow decorated cookies to come to room temp before opening the freezer bag or container, especially if you wrapped your cookies in bags before freezing. If you don't allow the cookies to come to room temp, the temperature difference could cause condensation inside the cookie package and could result in color bleeding on your icing. So, again, allow those cookies to come to room temp before opening the bag/container!
Tip #4 Freeze Once
I don't have scientific evidence to back up this tip, but in my experience it is best to freeze just once. Refreezing can dry out your cookies. So if I froze the undecorated cookies, I will not also freeze after decorating...it really depends on my schedule and when I have time to bake and decorate. But, I don’t freeze twice.
Tip #5 Store up to 3 Months
If packed and stored well, I will freeze cookies (and dough) up to 3 months. Again, cookies and dough can be sensitive to scents in the freezer, so it might be helpful to keep a box of Arm & Hammer close by.
Tips for Storing and Freezing Royal Icing
I like to mix my icing the day before I decorate. Since I'm using meringue powder, I will store icing on the countertop. But, if you're using a recipe with egg whites, you'll need to store the icing in the refrigerator.
If I'm working a few days in advance, I will store icing the refrigerator (up to a week).
If I'm working a few weeks in advance (like for a BIG cookie project), I will store icing in the freezer...again in a freezer quality container. I store icing up to 30 days. Arm & Hammer will keep your freezer from getting funky.
Happy Freezing!
After you read this post, if you're still unsure, I recommend freezing a few tester cookies with your next cookie project. Then you can decide if freezing cookies is an option for you. Most people would never be able to tell if a cookie had been frozen. AND, I even have a cookie friend that freezes ALL her cookies intentionally because she thinks it makes them softer.
Are you looking for more tips on working smarter, not harder? Check out my in-depth online class SMART COOKIES. Here's a sneak peek at the class!
Smart Cookies is all about navigating the cookie process better, faster and more efficiently while still having fun! It covers so many topics including: designing cookie sets, creating a cookie timeline, planning for icing, saving time with quick techniques, all while keeping the JOY in decorating! Plus, it is packed with lots of fun cookie demos!!!
Happy Decorating!
Anne
]]>
https://flourbox.com/blogs/tidbits/black-friday-2019-sneak-peak2019-11-25T21:53:00-05:002019-11-25T21:55:24-05:00Black Friday 2019 Sneak PeakAnne Yorks
We are so excited for the Black Friday weekend! Check out these deals that will be available starting at 6am (EST) on Friday, Nov 29th and will end at midnight on Monday Dec. 2. Limited quantities on all deals!
Free Shipping on U.S. Orders over $25
We are running free shipping on all U.S. orders over $25. No coupon code needed!! Starts at 6am on Friday, Nov 29th and ends at midnight on Monday Dec 2nd!
Airbrush Bundles - FREE Stencil Genie AND Genie Icing Scraper with the purchase of an airbrush system (that's a $29.48 value!!)
Get a FREE Stencil Genie and Genie Icing Scraper ($29.48 value) with the purchase of The AirGenie Pro Airbrush System. It is compact, light weight, and quiet. Plus, it features variable speed control. It is the choice of many pro decorators! The AirGenie Pro includes compressor, THREE airbrush guns, three leather-like airbrush storage pouches, power cord, hose, quick connect hose and fittings, and maintenance tools. Plus, get FREE SHIPPING starting at 6am (EST) Nov 29th through midnight on CyberMonday. LIMITED QUANTITIES. No rainchecks. Cannot be combined with any other offers or coupons. No coupon code required.
Get a FREE Stencil Genie AND Genie Icing Scraper ($29.48 value) with the purchase of The Cookie Countess Airbrush System. It is the perfect decorating tool. Easy to assemble and use, this airbrush system will bring your decorated treats to the next level! It features a 25 PSI compressor, single action gun, .04 mm nozzle, and integrated holder. This system includes a one year warranty. Plus, get FREE SHIPPING starting at 6am (EST) Nov 29th through midnight on Cyber Monday!!LIMITED QUANTITIES. No rainchecks. Cannot be combined with any other offers. No coupon code required!
Here Comes Santa Doorbuster Deal
Get the Sugarbelle Here Comes Santa Cutter Set for only $7.99 (that's 30% off!) *Limited quantities. No rainchecks. Offer ends at midnight on Dec 2nd! No coupon code required!!
Christmas PYO Stencil Bundle - Save 15%
Host a cookie painting party this holiday season with this Paint-Your-Own stencil bundle. This bundle includes 2 Paint-Your-Own stencils (Santa and Rudolph and Ice Skating Gingerbread), 3 icing scrapers, 36 edible Christmas paint palettes and 36 PYO brushes. No substitutions. LIMITED QUANTITIES. No rainchecks. Cannot be combined with any other offers. No coupon code required!
Dough EZ Rolling System - Save $5
AVAILABLE AT 6am (EST) Nov 29th. Roll beautiful, even cookies every time with the Dough EZ rolling mat - with little to no added flour! Plus, free shipping on orders over $25 on Black Friday!
Jewel Dust - Save 30%
Coupon Code Applied at Checkout! Regularly priced at $7.99, now only $5.59 per jar!
How to Host a Cookie Decorating Class - ebook only $14.99!
This is the lowest price ever on our popular ebook!! Black Friday price AVAILABLE AT 6am (EST) NOV 29th! How to Host a Cookie Decorating Class is a 71 page, full-color ebook written by Anne Yorks of The Flour Box. If you're passionate about cookie decorating, then you may be ready to take the leap into hosting cookie classes. This ebook is a comprehensive resource that will help you select a location, market your class, handle registration and cancellations, communicate with students, set pricing, plan curriculum, prep for class, and prepare for the unexpected. Plus, the resources section of the book includes sample handouts, class emails, sample class outline, and a prep list!
]]>
https://flourbox.com/blogs/tidbits/its-been-a-big-year-for-the-flour-box2019-11-07T13:40:00-05:002019-11-11T07:25:38-05:00It's been a BIG YEAR of CHANGES for The Flour Box!!Anne Yorks
No doubt, it's been a big year of changes for the The Flour Box. Here's the lowdown on what we've been up to in 2019...
This video is a great overview, BUT, if you want the nitty gritty details, scroll down to read the full post!
We moved the shop!
In June, we packed up the kids and the cookie cutters and moved to a new, bigger space for both family and business. Our new location is in Centre Hall, PA - about 15 minutes from our old place.
We are loving it here! We took the summer to renovate the shop and classroom area and it is so dreamy. We are still an online retailer (not a traditional shop), but teach live cookie classes in our classroom!
The new space is a happy place!
We changed our name and logo
As part of being more focused in our business, we changed our name from Flour Box Bakery to The Flour Box. That's right, the bakery portion of the business is stepping down as we focus on bringing you great tutorials and supplies! You can find us online at www.flourbox.com.
We redesigned our website
It's so sparkly and new and amazing to use! Let me point out some of the highlights.
The Cookie Decorating KIT Page
On these pages you can learn and shop all at the same time. We add at least one new kit a month. These kits have the essential CUTTERS and STENCILS and a few BONUS tools to create a beautiful cookie set without the stress! And kits are cool because they save you 10% on the items featured in the kit!
Every kit page has a free step-by-step video, free downloadable templates, free icing guide, and tons of bonus cookie decorating tips!
And, it's easy to buy the complete kit with one click. But, if you already have some of the items in the kit, you can also shop a la cart. Just click ADD from the kit list and it goes right to the cart! So easy!
The Homepage Features
The homepage is packed with tons of features! Want to find the newest cookie kit? Sign up for the email list? Buy a decorating essential? Or see our best sellers of the season? You can DO IT ALL from the homepage of www.flourbox.com! Use the menu at the top to quickly jump to a specific collection!
Shop by Occasion
Another amazing improvement with www.flourbox.com is the ability to SHOP BY OCCASION! If you’re making cookies for a specific holiday or celebration and want to see ALLLL the cutters, stencils, and products with that theme, you can! That’s right! This category has all the options mingled together so you can get tons of inspiration. Now you can shop for your turkey stencils and cutters all in one place – it’s so convenient!
Change is easier with friends!
I eat an English Muffin every day for breakfast. I love it. I love routine. Habits give me comfort. So needless to say, I've been out of my comfort zone this year.
All this change was a team effort - so thank you to our amazing team AND customers! Thank you Topher, Grace, and Cecelia for supporting my cookie dreams. Thank you Kristyn, Stacy, and Amy for being by my side during all these changes. Thank you Janet, Andy, Anne, Tim, Pete, and Natalie for being your own experts so I can focus on the cookies! And thank you to all Flour Box customers!! We love serving you!
Send us Feedback!
We are excited to see how these changes impact your learning and shopping experience. I invite you to send your feedback to hello@flourbox.com!
The best news? The year isn't over yet! We have 4 more NEW DECORATING KITS coming in the next few weeks and a really amazing Black Friday plan. So keep in touch and let me know how we can support your cookie decorating adventure!
Happy Decorating!
Anne
]]>
https://flourbox.com/blogs/tidbits/how-to-decorate-five-thanksgiving-cookies2019-10-30T07:15:00-04:002019-10-30T13:53:43-04:00How to Decorate FIVE Thanksgiving CookiesAnne Yorks
Gratitude is such a big part of my life and I think that is why I love Thanksgiving so much! I love the food, my family, and of course I love making Thanksgiving cookies! In today's tutorial, I'm going to show you how to make turkeys, pilgrims, pie slices, trees and leaves - OH MY!! Grab the decorating kit for the essential cutters and stencils to recreate these tasty masterpieces!
Getting Started
Check out the video tutorial - a step-by-step guide to making these cookies!
Cookie Yield
For a single batch of dough I was able to make 20 of these cookies, 5 pilgrim/snowman faces, 3 maple leaves, 4 turkeys/trees, 4 pie slices/candy corn, and 4 acorn/pilgrim. I should note that I roll my cookies to 1/4" thick using the Dough EZ Rolling Mat System. The thickness of your cookies will impact your yield.
COOKIE RECIPE: For a cookie recipe and rolling and baking video CLICK HERE - this recipe can be doubled in a KitchenAid Mixer.
For a single batch of dough, I typically use a single batch of icing. Since I'm using a KitchenAid mixer, I made a double batch of icing (about 36 oz of icing) and split it in half (reserving half for another project).
A total of 18 oz of icing. I don't measure exactly...I estimate. For a more detailed look at icing planning, CLICK HERE to read this helpful blog post.
On this project I used ChefMaster food gels. I use the color straight from the bottle to make my icing colors. For this project I used fleshtone, buckeye brown, sunset orange, gold, tulip red, and coal black. I use the gold to make both the deeper gold color and the lighter ivory color. The buckeye brown made both the light and dark shades of that color. To make the pumpkin color I used mostly sunset orange, but added 2 dots of buckeye brown to give it a ruddy tone. Tulip Red (no taste red) has tones of orange undertones and makes the PERFECT fall red. It is VERY helpful to make colors like black the day before you decorate (see my schedule below). You will add less gel and the color will deepen over night. CLICK HERE to check out all the food gel options in our shop.
With this tutorial, I'm providing several templates. You can download a file for both the boy and girl pilgrim to use with your projector (or cut and trace lines on the cookies). I have also provided the turkey wing transfer sheet, the turkey body (good for tracking) and the full turkey template (good for your projector). CLICK HERE - to download the .zip file will all the images.
Project Timeline
DAY 1: PREP COOKIES AND ICING
Mix Dough (30 mins), Chill Dough (2 hours inactive time), Roll and Bake (1 hour), Mix Royal Icing and Prep Icing Colors - it is helpful to make the colors (especially black and navy) the day before you decorate because the color will deepen overnight (1 hour)
DAY 2: DECORATE
Outline and Flood Cookies (1-2 hours), Allow to dry in front of fan before adding details (1 hour for standard cookies, but allow 6 hours of dry time on the cookie stenciled with royal icing), Piping details, painting gold accents, and stenciling (1.5-2.5 hours)
**ALLOW COOKIES TO FULLY DRY 18-24 HOURS BEFORE PACKING. STORE IN A COOL OVEN OVER NIGHT.**
DAY 3: PACKING COOKIES
It usually takes about 30 minutes to heat seal 2 dozen cookies, but plan for an extra 15 minutes if you're adding ribbons to the package. For tips on packing cookies, CLICK HERE to check out this helpful blog post with links to my favorite packing and shipping materials.
I want to see what you make! So be sure to tag @theflourboxshop on Instagram and Facebook and use #theflourbox so I can see what you create!
Happy Decorating!
Anne
]]>
https://flourbox.com/blogs/tidbits/how-to-decorate-five-cozy-fall-cookies2019-10-16T06:29:00-04:002019-10-16T08:10:14-04:00How to Decorate FIVE Cozy Fall CookiesAnne Yorks
I love decorating fall cookies! Maybe it's because I love everything about fall!! The cooler weather, the changing of the leaves, hot lattes and puffy vests!!! And because fall is the perfect time to get cozy, I created the Cozy Fall cookie set! I went a little non-traditional with the icing colors on this project and loved the final results.
In this tutorial, I'll share how to create beautiful dimension with the puffy vest cookie, a wet-on-wet plaid for the scarf, a stenciled pumpkin, a quick-and-easy leaf, and an airbrushed latte cup!
These cookies are all in the 3’ – 3.5” size range. With a single batch of dough I made 21 cookies, 5 3" pumpkins, 5 scarves (ribbon cutter), 3 lattes, 3 vests (basketball jersey), and 4 leaves. I should note that I roll my cookies to 1/4" thick using the Dough EZ Rolling Mat System. The thickness of your cookies will impact your yield.
For a cookie recipe and rolling and baking video CLICK HERE - this recipe can be doubled in a KitchenAid Mixer.
Prepping Royal Icing
Usually for fall sets I use a combo of green, yellow, orange, and red. But I was in the mood to change it up a little. Here's a guide to this fun color palette. To create a muted tone to the icing, I added several drops of ivory to each color.
For a single batch of dough, I typically use a single batch of icing. Since I'm using a KitchenAid mixer, I made a double batch of icing and split it in half (reserving half for another project).
I don't measure exactly...I estimate. For a more detailed look at icing planning, CLICK HERE to read this helpful blog post.
This kit comes with FREE templates (latte, scarf, and vest). These are great to use with a cookie projector (like a KopyKake or a Pico).
Project Timeline
I like to break up the decorating process to fit in my schedule. Because there are several phases to decorated cookies, it works better with my life to do a little each day. Here is the schedule for this cookie project and estimated times on how long each phase takes.
DAY 1
Mix Dough (30 mins), Chill Dough (2 hours inactive time), Roll and Bake (1 hour), Mix Royal Icing and Prep Icing Colors - it is helpful to make the colors the day before you decorate because the color will deepen overnight (1 hour).
DAY 2
Outline and Flood Cookies (1-2 hours), Allow to dry in front of fan before adding details (1 hour for standard cookies, but allow 6 hours of dry time on the cookies stenciled with royal icing like the pumpkin), Piping details, and stenciling (1.5-2.5 hours)
**ALLOW COOKIES TO FULLY DRY 18-24 HOURS BEFORE PACKING. STORE IN A COOL OVEN OVER NIGHT.**
DAY 3
For tips on packing cookies, CLICK HERE to check out this helpful blog post with links to my favorite packing and shipping materials.
Packaging Tips
I have two great packaging suggestions for these cookies. You can pack the cookies individually and use the 14” window box from BRP to sell or give the cookies as a collection.
These cookies also make great cookie sets. You can fit 2-4 cookies (with some overlap) in the 9” window box.
Recreate these!
I would be so flattered if you recreated these cookies! Be sure to tag @flourboxshop or use hashtag #theflourbox so we can see what you create!
Happy Decorating!
]]>
https://flourbox.com/blogs/tidbits/how-to-decorate-cute-halloween-cookies-and-kit2019-09-20T07:15:00-04:002019-11-09T01:24:19-05:00How to Decorate Cute Halloween Cookies (and KIT)Anne Yorks
This Halloween, impress your party guests and trick-or-treaters with adorable Halloween cookie sets! For this tutorial, I’m so excited to show you step-by-step how to make 3 adorable Halloween designs that pair with a stencil. The designs work well as a collection or in pairs to make cute cookie box sets!
Plus, the essential cutters and stencils for making the coolest pumpkin, a cute spider on web, or a candy-loving ghost are now available in the Cute Halloween Cookie Decorating Kit!
Watch the video and get tips on making these cookies
Cookie Yield
COOKIE YIELD: These cookies are all in the 3’ – 3.5” size range. With a single batch of dough I made 15 cookies. I should note that I roll my cookies to 1/4" thick using the Dough EZ Rolling Mat System. The thickness of your cookies will impact your yield.
COOKIE RECIPE: For a cookie recipe and rolling and baking video CLICK HERE - this recipe can be doubled in a KitchenAid Mixer.
Prepping Royal Icing
For this tutorial let me break down each set by color
For the pumpkin, I used Sunset Orange, Buckeye Brown, Black Diamond, Bright White, and Leaf Green.
For the spider, I used Purple, Black Diamond, and Bright white…and a teeny tiny bit of green on the spiders eyes.
For the ghost, I used Bright White, Black Diamond, Sunset Orange, and Lemon Yellow.
For a single batch of dough, I typically use a single batch of icing. Since I'm using a KitchenAid mixer, I made a double batch of icing and split it in half (reserving half for another project).
I don't measure exactly...I estimate. For a more detailed look at icing planning, CLICK HERE to read this helpful blog post.
This kit comes with FREE templates. Each cookie (ghost, spider, and pumpkin) have a digital template. These are great to use with a cookie projector (like a KopyKake or a Pico).
I have also created a royal icing transfer sheet for the candy corn, spider, and aviator sunglasses in case it helpful to make this icing accents ahead of time. After you mix icing colors, I suggest making your transfers and allowing them to dry overnight. I find royal icing transfers are also a great alternative to using a cookie projector! It’s lower cost and super easy! Watch how I used a royal icing transfer to make the cute ghost holding a candy corn.
Project Timeline
I like to break up the decorating process. Because there are several phases to decorated cookies, it works better with my schedule to do a little each day. Here is the schedule for this cookie project and estimated times on how long each phase takes.
Day 1
Mix Dough (30 mins), Chill Dough (2 hours inactive time), Roll and Bake (1 hour), Mix Royal Icing and Prep Icing Colors - it is helpful to make the colors the day before you decorate because the color will deepen overnight (1 hour). Make royal icing transfers (30 mins).
Day 2
Outline and Flood Cookies (1-2 hours), Allow to dry in front of fan before adding details (1 hour for standard cookies, but allow 6 hours of dry time on the cookies stenciled with royal icing or with the foodoodler), Piping details, and stenciling (1.5-2.5 hours)
**ALLOW COOKIES TO FULLY DRY 18-24 HOURS BEFORE PACKING. STORE IN A COOL OVEN OVER NIGHT.**
Day 3
For tips on packing cookies, CLICK HERE to check out this helpful blog post with links to my favorite packing and shipping materials.
Stenciling Bonus Tip
It wasn’t too much more work to airbrush a quick background on the stenciled cookies. I loved the quick pattern behind the words.
I kept the backgrounds light enough to make sure the text was still easy to read. Don’t you think those easy backgrounds make a big impact? These background stencils are not available in the kit, but can be purchased separately.
Packaging
I have two great packaging suggestions for these cookies. You can pack the cookies individually and use the 14” window box from BRP to sell or give the cookies as a collection.
These cookies also make great cookie sets. You can fit 2-3 cookies in the 9” window box.
Recreate these!
I would be so flattered if you recreated these cookies! Be sure to tag @flourboxshop or use hashtag #theflourbox so we can see what you create!
Happy Decorating!
Anne
]]>
https://flourbox.com/blogs/tidbits/how-to-decorate-a-donut-cat2019-09-10T18:36:00-04:002019-11-09T01:24:02-05:00How to Decorate a Donut Cat CookieAnne Yorks
Totally cute and unique, these Donut Cat cookies will delight your party guests. And with only 3 icing colors and a POP from sprinkles, I promise these are easy to make!
It's birthday season in our house. Both of the my girls have birthdays within 2.5 weeks apart. It's a lot of balloons, presents, and of course cookies. And on top of that, this year my youngest daughter's birthday fell on the 2nd day of school. There's just so much going on. It's all exciting stuff, but there are a lot of balls to juggle.
Thankfully, this custom project was made easier by using a cookie cutter. The cat face cutter just happened to be the perfect size and shape for a donut cat!
Let's watch the video to see how this cookie comes together!
Cookie Yield
This is a medium cookie. So for a single batch of dough, you can make 16-18 of these cookies. I should note that I roll my cookies to 1/4" thick using the Dough EZ Rolling Mat System. The thickness of your cookies will impact your yield.
COOKIE RECIPE: For a cookie recipe and rolling and baking video CLICK HERE - this recipe can be doubled in a KitchenAid Mixer.
For a single batch of dough, I typically use a single batch of icing. Since I'm using a KitchenAid mixer, I made a double batch of icing and split it in half (reserving half for another project).
These cookies feature 3 icing colors - that makes for a good decorating day IMHO! The main colors are the pastel brown (using Buckeye Brown) and pastel pink (using a teeny tiny dot of deep pink). I used 12 oz of the brown, 5 oz of the pink, and 1 oz of the black. I don't measure exactly...I estimate. For a more detailed look at icing planning, CLICK HERE to read this helpful blog post.
For a royal icing recipe and video CLICK HERE - this recipe can be doubled in a KitchenAid Mixer.
Sprinkles
Sprinkles are always fun and made this cookie so easy (much quicker than piping all those sprinkles.) I use the Pastel Party sprinkle set.
Sending these into school was easy with this window box.
Since this project required some late night decorating, I definitely queued up my favorite YouTube channel - Katnipp. She's an illustrator that runs an Etsy store in England and she is so freaking adorable!
I would be so flattered if you would recreate these cookies! Definitely tag me @flourboxbakery or use hashtag #flourboxbakery so I can see what you make!
Happy Decorating!
Anne
]]>
https://flourbox.com/blogs/tidbits/five-tips-for-decorating-mini-cookies2019-09-04T05:28:00-04:002019-11-09T01:24:15-05:00Five Tips for Decorating MINI CookiesAnne Yorks
Mini cookies are everywhere! Probably because making mini cookies is the best!! Check out this tutorial with FIVE tips to maximize the fun with mini cookies! (which means keeping things as easy as possible).
Check out the video to watch these cookies being decorated!
Tip #1
Keep all your mini cookies on one tray for baking...they'll bake at the same rate. Don't put a mini next to a regular or large sized cookie. They will overbake!
Tip #2
Keep the designs SIMPLE. Maximize the fun, but minimize the work. Polka dots are a great option on minis!
(Sidenote! These cookies should come with a warning. They are so yummy and fun to pop. You almost can't stop eating them!)
Tip #3
Use tipless bags. Clean up is a cinch! Just pitch em! I like to use 20-sec icing when making minis...it's a medium consistency and you can outline and flood with the same bag! Plus, our tipless bags are BACK IN STOCK - whoop! CLICK AND SHOP!
Tip #4
Accent with Sprinkles. This is sort of a no-brainer since sprinkles make every cookie more fun. But adding a pop of color and texture with sprinkles without have to making more icing is clutch! This Autumn Harvest sprinkle is pretty awesome!
Tip #5
These cookies might be simple, but you can totally make them a showstopper with cute packaging. I love the Drawn By Krista Etsy shop. I buy and print my treat toppers in minutes! CLICK HERE and check out her shop!
PREPPING THE COOKIES and YIELD:
COOKIE YIELD: You can basically make 3 minis for every 1 regular sized cookie...so your yield will be TRIPLE for minis! For a single batch of dough I was able to make almost 50 minis from a single batch! I should note that I roll my cookies to 1/4" thick using the Dough EZ Rolling Mat System. The thickness of your cookies will impact your yield.
COOKIE RECIPE: For a cookie recipe and rolling and baking video CLICK HERE - this recipe can be doubled in a KitchenAid Mixer.
CUTTERS
(click on photo to view all MINI cutters): This video features the mini cute apple, mini acorn, mini pumpkin, and mini maple leaf...but Ann Clark just released a bunch of NEW minis! Check em out!
PREPPING THE ROYAL ICING:
ICING PREP:For a single batch of dough, I typically use a single batch of icing. Since I'm using a KitchenAid mixer, I made a double batch of icing (about 36 oz of icing) and split it in half (reserving half for another project).
This set has 7 colors and I added IVORY to each of them to create a more muted fall tone: I portioned them evenly: Super Red, Sunset Orange, Lemon Yellow, Leaf Green, Sky Blue, Buckeye Brown and Ivory. CLICK HERE to check out all the food gel options in our shop.
ROYAL ICING RECIPE: For a royal icing recipe and video CLICK HERE - this recipe can be doubled in a KitchenAid Mixer.
I hope you enjoyed this quick look at making mini cookies! Share YOUR tips below!
I want to see what you make! So be sure to tag @Flourboxbakery on Instagram and Facebook and use #flourboxbakery so I can see what you create!
Happy Decorating!
Anne
]]>
https://flourbox.com/blogs/tidbits/how-to-decorate-six-football-cookies2019-08-27T06:20:00-04:002019-11-09T01:24:23-05:00How to Decorate Six Football CookiesAnne Yorks
It’s time to show your team spirit! I’m kicking off football season with this tutorial that features 6 football themed cookies! You can make them too – just personalize the cookies with your team colors!
In this tutorial, I’ll show you step-by-step how to make a player cookie, a helmet, and a football. I’ll also show you how to use a royal icing transfer to make quick and easy jersey cookies. Plus, I’ll share tips on cookie stenciling on two cookies and that will speed up the decorating! Then I’ll show how I take the stenciled field cookie to the next level!
Let's get decorating!
PREPPING THE COOKIES and YIELD:
COOKIE YIELD: For a single batch of dough I was able to make 18 of these cookies! I should note that I roll my cookies to 1/4" thick using the Dough EZ Rolling Mat System. The thickness of your cookies will impact your yield.
COOKIE RECIPE: For a cookie recipe and rolling and baking video CLICK HERE - this recipe can be doubled in a KitchenAid Mixer.
TEMPLATES:
Using a template can help guide the cookie design and build confidence when decorating. You can use them with a projector or print and cut them out to trace lines (with a food safe marker) on the cookie surface. Although, sometimes it is quicker to decorate freehand, especially with these pretty straight forward cookies.
In this video, I also used royal icing transfers for the jersey numbers. Click on the link below to download both the templates and the transfer sheet. If you want to make your own transfer sheet (custom jersey numbers), I used the Collegiate Font at size pt. 85.
Download the zip file for the templates - CLICK HERE
CUTTERS
(click on photo to view the sports cutter collection): This set features the Large Football, T-shirt by Flour Box, Helmet, Skull and Square.
There are so many cutters, stencils and tools in this box!This kit includes: FIVE cutters (Large Football, T-shirt by Flour Box, Helmet, Skull and Square), Field Lines Stencil, Tailgates and Touchdowns Stencil, Black Ultra Thin Foodoodler, Wilton Tip #44, Boo Boo Stick, 10 Tipless Bags (5 10" and 5 13")! (**kit does not include standard decorating supplies like ingredients, food safe brush, standard tips like #1 or #2, or food gels. These need to be purchased separately.)
Also featured in the tutorial is the Black Foodoodler Marker. I used this to add the eye black. To avoid poking a hole in the icing, It's important to allow the icing to dry 6 hours before writing on the surface with a marker. This marker was also featured in the Easter box, but you can't have too many of these! You can find it in the football kit or buy one individually - click here!
PREPPING THE ROYAL ICING:
ICING PREP:For a single batch of dough, I typically use a single batch of icing. Since I'm using a KitchenAid mixer, I made a double batch of icing (about 36 oz of icing) and split it in half (reserving half for another project).
I typically like to stick to five icing colors, and it still takes me about an hour to make the icing and mix the colors! This set has 8 colors: Navy, White, Black, Gray (I used a dot of black to make it), Fleshtone, Buckeye Brown, and Leaf Green. CLICK HERE to check out all the food gel options in our shop.
I used 5 oz of white, 5 oz of Navy, 3 oz of leaf green, 3 oz of Buckeye Brown, 2 oz of fleshtone, and 1 oz of Black, and 1 oz of Gray. I used about 20 oz of icing. I don't measure exactly...I estimate. For a more detailed look at icing planning, CLICK HERE to read this helpful blog post.
I did make two icing colors for skin for the football players. For the white player, I used the chefmaster fleshtone and for the black player I used fleshtone plus a dot or two of the buckeye brown. You can tweak this combo to make different skin tones.
Isn't he cute?
ROYAL ICING RECIPE: For a royal icing recipe and video CLICK HERE - this recipe can be doubled in a KitchenAid Mixer.
PLANNING YOUR PROJECT TIMELINE:
(You'll have more fun decorating cookies if you plan ahead and break up the project. I found that it just fits better in my life than tackling everything in one day. Times based on a single batch of cookies, increase as needed):
Day 1 PREP COOKIES AND ICING: Mix Dough (30 mins), Chill Dough (2 hours inactive time), Roll and Bake (1 hour), Mix Royal Icing and Prep Icing Colors - it is helpful to make the colors the day before you decorate because the color will deepen overnight (1 hour). Make royal icing transfers (30 mins).
Day 2 DECORATE: Outline and Flood Cookies (1-2 hours), Allow to dry in front of fan before adding details (1 hour for standard cookies, but allow 6 hours of dry time on the cookies stenciled with royal icing or with the foodoodler), Piping details, and stenciling (1.5-2.5 hours)
**ALLOW COOKIES TO FULLY DRY 18-24 HOURS BEFORE PACKING. STORE IN A COOL OVEN OVER NIGHT.**
Day 3 PACKING COOKIES: For tips on packing cookies, CLICK HERE to check out this helpful blog post with links to my favorite packing and shipping materials.
MATERIALS LIST:
Did you notice my new scribe in the tutorial? We just got these cute scribes with beads in stock! You can find it in the shop - click here!
Football Cookie Decorating Kit: Pick up the stencil and cutters and essential tools as one kit. Regularly $27.86, but save 10% when purchased as a bundle for $24.99. CLICK HERE to view in shop.
With Penn State in my backyard, I have made a ton of football themed cookies.
Watched the tutorial and looking for more football inspiration?? Take a look...
How about some super realistic footballs? Lots of icing areas on this design, but worth the extra work!
Not all footballs have to be brown. Check out these camo footballs!
The L-O-V-E cutter makes an awesome Love Football cookie design! I used tip #301 for the small laces and it worked perfectly!
I also love making this cute football player using the Sugarbelle boy cutter. Check out the video tutorial for this cutie - CLICK HERE.
These football cupcakes are a crowd pleaser AND they are sooooooo easy and fun to make! Use tip #44 to make the laces on the cupcake wrapper!
Do you know Bride and Groom super fans? Use team colors to make cute jerseys! Replace the jersey number with a B or G. These are fun for a tailgate engagement party!
Make a Collegiate letter cookies with a football twist!!
I hope you enjoyed this football tutorial!
I want to see what you make! So be sure to tag @Flourboxbakery on Instagram and Facebook and use #flourboxbakery so I can see what you create!
Happy Decorating!
Anne
]]>
https://flourbox.com/blogs/tidbits/how-to-decorate-a-soft-serve-ice-cream-cookie2019-07-08T07:47:00-04:002019-11-09T01:23:49-05:00How to Decorate a Soft Serve Ice Cream Cone CookieAnne Yorks
The best cones have ice cream so tall it almost topples over! Check out this quick view of the Soft Serve Ice Cream Cone cookie. I’m in full summer decorating mode (which means keeping things as easy as possible) and this project features a simple approach with 3 icing colors and pops of colors from the Sweet Tooth Fairy Pastel Party Sprinkle Mix.
But, we have more than 70 difference sprinkle pouches, sets, and tubes in the shop! SHOP NOW!!
This ice cream is super fun because it only has THREE icing colors (you can call me lazy, but I call it smart decorating!) I used white for the ice cream. ivory + buckeye brown for the cone, and diamond black for the eyes.
But despite the simple approach, this cookie is sooooo cute!
I love ice cream projects in summer! Check out these other ideas for inspiration!
]]>
https://flourbox.com/blogs/tidbits/vintage-bathing-beauties2019-07-01T18:22:00-04:002019-11-09T01:23:57-05:00Vintage Bathing Beauties - a tribute to my momAnne Yorks
Last summer, Melanie at Killer Zebras invited me to participate in her annual calendar project that benefits a charity - A New Dawn. She let us pick our month and I was so grateful July was available.
July is special to me because July 1st is my mom's birthday. I lost her on Christmas Day in 2017. We were so close (next door neighbors to be exact) and so this all has been hard for me. Here I am with my brother and sister and our mom at a wedding.
My mom would be 68 today. I know it is cliche, but I miss her every day. Thankfully she has left me with a lifetime of amazing memories. She was my original baking buddy. I loved spending time with her in the kitchen at christmas time. My mom was a single mom who worked two jobs and so that time was really precious to both of us.
Our family loves to tell funny Nana stories. Like the time she couldn't see her cheese in the movie theater. Or all the times she sat on her reading glasses and broke them. The time we were playing mini golf and I hit her in the head with a golf ball. We still call Panda Express (you know the fast food restaurant), Panda Chicken because she could never remember the name. I love to remember our sledding adventures on the back hill. The legendary porch parties with friends in Kempton. And our many many trips to the beach and all the fun memories, including our family dance parties at the Windrift, in Avalon, NJ.
My mom was smart. She should have tried out for Jeopardy. She was loving, so-stinkin-hilarious, and such a good listener. I think miss that the most. She loved my brother, sister, and I uniquely and equally.
Every year on her birthday I would make her special cookies. She was my biggest support as I started my cookie business and I loved to make her feel extra special on her birthday. I share some of my favorite projects I made for her below (if you're interested).
So for the calendar project, I was so excited to make cookies in honor of my mom. I'm not sure I've had more fun decorating cookies than I did when I created these vintage bathing beauties.
These cookies were based on figurines my mom and I used to admire in a shop in Stone Harbor, NJ. I wish I could remember the name of the shop! Here is the inspiration for this project - a photo taken of their front window display ...
I created a sketch of the cookies and cut the cookies out by hand.
And then I had a blast decorating the bathing suits and beach balls with fun colors and patterns. (I definitely broke my 5 color icing rule!)
This calendar is available on the Killer Zebras website. I know it is half way through the year, but it's a pretty cool collection of cookie ideas. Plus, 100% of the proceeds goes to A New Dawn. Click Here to buy the calendar.
And, as promised, here are a few of my favorite projects I made for my mom.
July 2017
July 2016
July 2015
July 2014
July 2013
July 2012
And her reaction to the mini tea set was priceless...
I made her vintage bathing beauties once before ... July 2011!
I hope you enjoyed this little glimpse into the inspiration of my calendar page ... and the walk down memory lane!
Happy Decorating!
Anne
]]>
https://flourbox.com/blogs/tidbits/we-moved-our-new-online-shop2019-06-17T10:40:00-04:002019-11-09T01:23:53-05:00WE ARE OPEN - Our NEW [online] ShopAnne Yorks
Have you heard? WE MOVED... just our physical location. You can still find our shop at www.flourboxbakery.com! We are settled in after our big move and the shop is back online and we are shipping orders!
Why did we move?? After 7 years in our 'two-car bakery', Flour Box was bursting at the seams and so we took the next big step in our cookie adventure! On June 12th, we moved both family and business to Centre Hall, PA (about 15 minutes from our previous Bellefonte location).
We are beyond excited for this new space!! It is FOUR times bigger than our old space.
Only a portion of the new space is finished. So, starting this summer we will begin construction on finishing a cookie studio/classroom AND more space for the inventory for our online shop. This will allow us to EXPAND :) We've already started by adding 57 NEW sprinkle jars, sets, and tubes to the shop.
Right now, we are working out of a temp space which will eventually be my office and a photo studio in the future!
Not only will we be able to expand our online shop with more of your favorite decorating products and tools. But we are also creating a new classroom experience for our Cookie School, for both our adult cookie classes and our family workshops! We'll be taking the summer off from teaching classes as we dream and build our classroom. Classes will resume this fall. (for an email update with the schedule of our new classes, email me at anne@flourboxbakery.com)
The Flour Box team - Kristyn, Stacy and Amy - have made the move with us. Let's be honest, our employees are freaking awesome, and they are the rock of our business. This new space will allow us to streamline filling orders and bring you an even better shopping experience. <3 And don't worry, we'll share more behind the scenes of how our team works. We have so much fun preparing your orders!
We wouldn't be making this move without our customers! Thank you so much for supporting and loving our family business. We hope it is clear that we love you guys and we love decorating with you!!!!!! Moving forward, we will continue to create a learning and shopping experience that makes cookie decorating really fun and super yummy!!
We can't wait to share tons of photos and updates soon - especially of the new studio space!
And if this move doesn't make your socks go up and down, we have a few more BIG Flour Box announcements coming later this summer! You might have already noticed that we refreshed our name and logo and we kind of love it!
As always, Happy Decorating!
Anne
]]>
https://flourbox.com/blogs/tidbits/were-moving-the-next-big-step-in-our-cookie-adventure2019-05-31T08:13:00-04:002019-11-09T00:30:42-05:00We're Moving! (the next big step in our Cookie Adventure)Anne Yorks
After 7 years in our 'two-car bakery', Flour Box is bursting at the seams and so we are taking the next big step in our cookie adventure! WE ARE MOVING!
On June 12th, we are moving both family and business to Centre Hall, PA (about 15 minutes from our current Bellefonte location). During this time our online shop will close on June 7th and reopen on June 17th.
We are beyond excited for this new space!!
Not only will we be able to expand our online shop with more of your favorite decorating products and tools. But we are also creating a new classroom experience for our Cookie School, for both our adult cookie classes and our family workshops! We'll be taking the summer off from teaching classes as we dream and build our classroom. Classes will resume this fall. (for an email update with the schedule of our new classes, email me at anne@flourboxbakery.com)
The Flour Box team - Kristyn, Stacy and Amy - will be making the move with us. Let's be honest, our employees are freaking awesome, and they are the rock of our business. I love them to pieces and based on your emails that you send me when you open your order boxes, we know you love them too!! They carefully, and beautifully, pack your orders with lots of love. This new space will allow us to streamline filling orders and bring you an even better shopping experience. <3 And don't worry, we'll share more behind the scenes of how our team works. We have so much fun preparing your orders!
We wouldn't be making this move without our customers! Thank you so much for supporting and loving our family business. We hope it is clear that we love you guys and we love decorating with you!!!!!! Moving forward, we will continue to create a learning and shopping experience that makes cookie decorating really fun and super yummy!!
We can't wait to share tons of photos and updates soon! There will be a remodeling project - EEK!
And if this move doesn't make your socks go up and down, we have a few more BIG Flour Box announcements coming later this summer!
One final reminder...during this time our online shop will close on June 7th and reopen on June 17th.


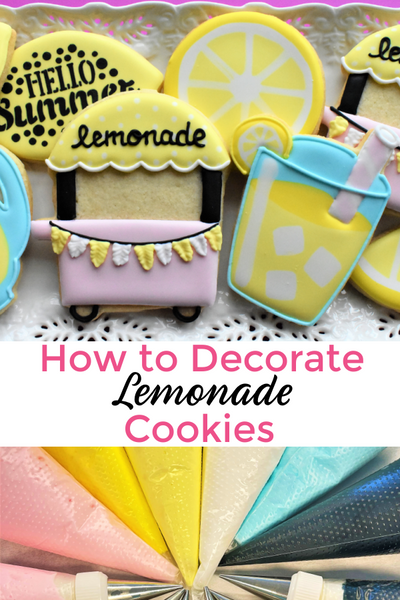


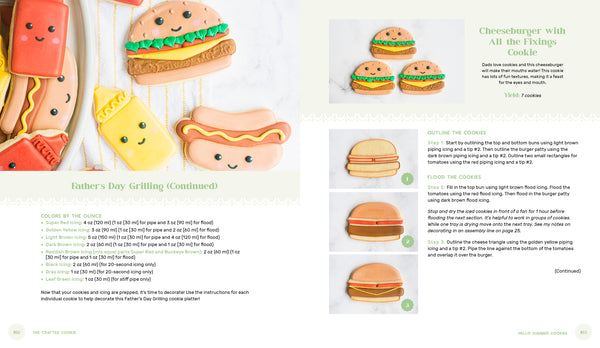


 I dive into icing basics, setting up your decorating space, cookie and icing storage, navigating the cookie process, and so much more! Get my tips on making icing consistencies and coloring your icing!