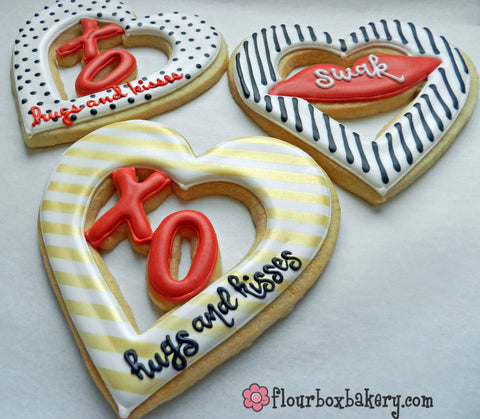
What better way to give hugs and hisses than to give the X-O in a cookie! I love how these fun XO cookies turned out.
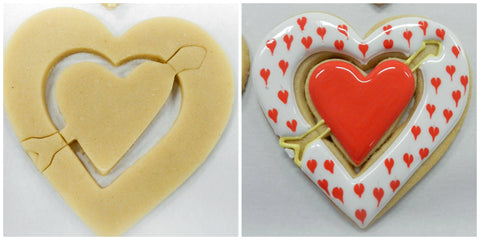
I had some extra dough when baking this week and wanted to take the opportunity to explore a unique cookie design with negative space.
Here are the steps to create this cookie:

Step 1: Cut out a large 5" cookie.
Step 2: From the 5" cookie, cut out a smaller 3" heart cookie (leaving the center of the heart open).
Step 3: Using the heart cut-out, use mini cutters to cut out an X and an O from the dough.
Step 4: Match it up on the inside of the large 5" heart. Be sure the ends touch the large heart to allow these areas to bake together.
Step 5: Using the 2-1 tool, pop the small X and O out of their cutters.
Step 6: Gently press and seal edges of X/O with large heart together.
BAKE COOKIE :)
Step 7: Outline heart and X and O.
Step 8: Flood the large white heart white. Allow this area to dry for 2-3 hours in front of a fan. Then airbrush with Luck's Gold color with the Narrow Strips stencil to create the background.
Step 9: Flood in the small red X and 0. I added 'hugs and kisses' to the heart in a fun font - but this is optional. I think the design would be cute with or without the text.
(TIP: if packing cookies in a heat sealed bag, allow to dry 18-24 hours before packing)
Here are two variations using a wet-on-wet technique.

To create the wet-on-wet heart, drop red polka dots on the wet white background. Pull scribe or toothpick through center of dot to create the heart shape.
I used this Wilton nesting hearts cutter set (available in our shop for $4.79 - not bad for four cutters) for the large heart and the cut-out.
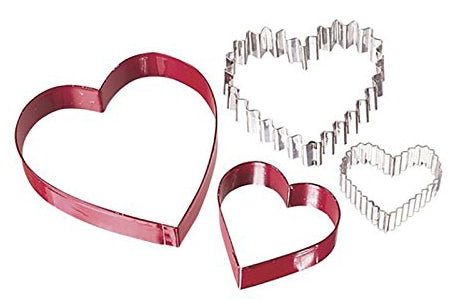
This set of mini cutters was perfect to create the section inside the heart. This set is also available in our shop and is $3.49. I also used the lips cutter and the heart with arrow on the two variations.

I loved how these turned out and I can't wait to give them to my special Valentine's! And, I'm excited to explore this idea again for another holiday. I bet this technique would be fun with an Easter egg!
Happy Decorating!
Anne

A message from Anne
“My blog is a collection of tidbits about the things I love... sugar cookies, baking, great food, cute stuff, and life in Happy Valley. Check back often for updates!!”
Get your cookie fix
Recent Posts